Like all networking devices, Linksys E2500 too can be set up using some easy steps. The Linksys App, and the web-based management wizard linksyssmartwifi.com are two common methods by which you can set things up and running in under no time. If you are looking for information on Linksys E2500 setup, this blog is what you need to read.
Linksys E2500 Default Password
The default password for your Linksys E2500 is always the word password itself. If it does not work, you can leave the password field blank and proceed directly with the Linksys E2500 Dual Band Wireless Router Setup.
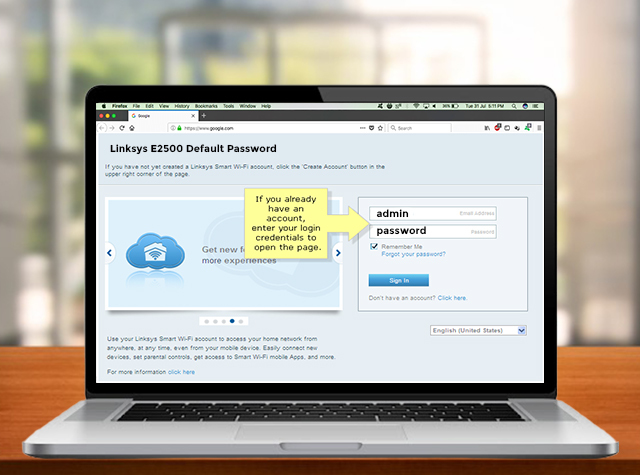
If you have changed the default password during the time of the initial setup, you’ll need to use the changed credentials instead of the default ones.
Linksys E2500 Setup
The manual method
- The setup process starts with making the connections between the networking devices and then accessing the settings wizard online and finally configuring the network settings. Here is the order in which you will need to follow the Linksys E2500 Dual Band Wireless Router Setup process:
- Connect your MODEM to the main router using an Ethernet cable. If you are going to use the computer system using a wired connection, connect the computer and the router using another Ethernet cable.
- As a next step, connect the power adapter to the devices and connect them to the power outlet. If the devices have a power on/off button, press them so as to power on the devices.
- Once all your devices are connected, go to your computer system and open the wireless networks section. Locate the network SSID and connect to the same by entering the network password.
- If you are using a wired connection to connect to the network, skip the above step.
Accessing the web-based setup wizard
- Now, open the web browser on your system and in the address bar, type linksyssmartwifi.com and press Enter. You will be directed to the Linksys router web-based setup wizard. If you are not directed to the wizard, the main IP address 192.168.1.1 can be used as the access wizard.
- When the web based setup page appears on the screen, type in the username and the password credentials as mentioned on the product label or in the user manual. The default username is admin and the default password you can use is password itself. You can also leave the password field blank and continue with the Linksys E2500 Dual Band Wireless Router Setup process.
- You will now reach the main dashboard and see a host of options available.
- Choose “Wireless Settings” and on the page you will see the option for defining the network SSID and the password. Type the name which you would want to set for your network, and a strong password. From the encryption type, set WPA2-PSK and click on the Next button.
- In the next screen, choose a username and password for your Linksys E2500 router device. These details will be the default admin credentials for your device. You can customize them to your preference.
- Once done, click on the Next button.
The final screen will show you the summary of the network connection with all the details mentioned. You can record the same or can print them for your convenience.
Troubleshooting the Linksys E2500 Dual Band Wireless Router Setup issues
Issues during the setup process are pertinent and can develop if proper steps aren’t followed. Though restarting the devices is always sought as the first resort, you can also follow some more steps to help resolve the issues at the earliest.
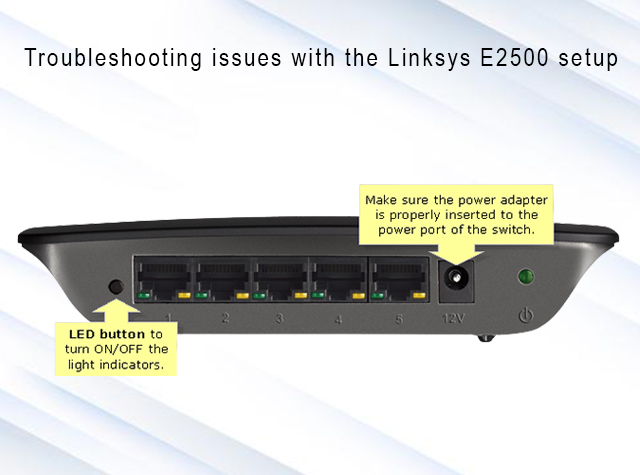
Check for the wired connections if you find any loose wire connections. Sometimes, due to loosely connected wires, you may face disconnection issues. Also check if there’s any fault in the Ethernet cables that you are using.
If performing these small checks doesn’t help, you can also perform Linksys E2500 RESET. To perform the reset operation, you will need to locate the RESET button on the back panel of the router. Press and hold the button or at least 10 seconds till the device restarts itself. The front LEDs on the device will flash, that indicate the RESET operation is being carried out. Once the RESET operation is complete, the router will reboot itself. Reconfigure the router settings using the steps mentioned above. Once reconfigured, reconnect all your devices and you can get back to working.